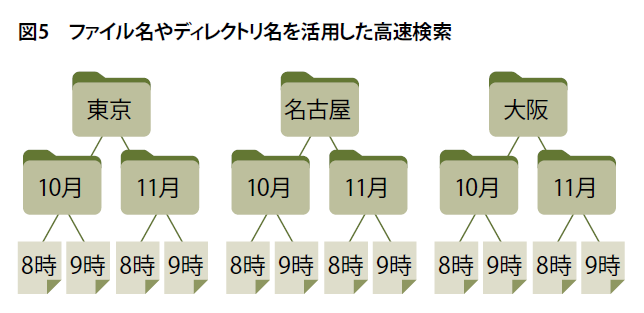
著者:飯尾 淳
本連載では「Pythonを昔から使っているものの、それほど使いこなしてはいない」という筆者が、いろいろな日常業務をPythonで処理することで、立派な「蛇使い」に育つことを目指します。その過程を温かく見守ってください。皆さんと共に勉強していきましょう。第28回では、インタラクティブなグラフを手軽に作成できる可視化ライブラリ「Plotly」を使って、さまざまなグラフを作成します。
シェルスクリプトマガジン Vol.98は以下のリンク先でご購入できます。


図2 散布図を描くコード
fig = px.scatter(df, x='sepal_width', y='sepal_length',
                 color='species', size='petal_length')
fig.update_layout(width=800, height=600)
fig.show()
図5 花弁の長さのデータを表示できるようにしたコード
fig = px.scatter(df, x='sepal_width', y='sepal_length',
                 color='species', size='petal_length',
                 hover_data=['petal_width'])
fig.update_layout(width=800, height=600)
fig.show()
図7 がくの幅の分布をヒストグラムで表示するコード
fig = px.histogram(df, x='sepal_width', color='species')
fig.update_layout(width=800, height=600)
fig.show()
図11 カラースキームを変更するコードの例
# 離散的なデータ向けのカラースキーム設定
px.defaults.color_discrete_sequence = px.colors.qualitative.T10
# 連続的なデータ向けのカラースキーム設定
px.defaults.color_continuous_scale = px.colors.sequential.GnBu
図13 四つのヒストグラムをまとめて表示するコードの例
from plotly.subplots import make_subplots

fig = make_subplots(rows=2, cols=2, shared_yaxes=True)
figs = [px.histogram(df, x='sepal_width',
                     color='species', barmode='overlay'),
        px.histogram(df, x='sepal_length',
                     color='species', barmode='overlay'),
        px.histogram(df, x='petal_width',
                     color='species', barmode='overlay'),
        px.histogram(df, x='petal_length',
                     color='species', barmode='overlay')]
i = 0
for f in figs:
  for g in f.data:
    fig.add_trace(g, row=(i//2)+1, col=(i%2)+1)
  i += 1
fig.update_layout(height=600, width=800,
                  title_text='4種類のヒストグラム',
                  barmode='overlay',
                  xaxis_title=‘sepal_width',
                  xaxis2_title='sepal_length',
                  xaxis3_title='petal_width',
                  xaxis4_title='petal_length')
fig.show()
図15 図13のコードの改良版
from plotly import graph_objects as go
from plotly.subplots import make_subplots

fig = make_subplots(rows=2, cols=2, shared_yaxes=True)
i = 0
for types in ['sepal_width', 'sepal_length',
              'petal_width', 'petal_length']:
  for species, g in df.groupby('species'):
    fig.add_trace(go.Histogram(x=g[types],
                               name=f'{species} ({types})',
                               opacity=0.7),
                  row=(i//2)+1, col=(i%2)+1)
  i += 1
fig.update_layout(height=600, width=800,
                  title_text='4種類のヒストグラム',
                  barmode='overlay',
                  xaxis_title=‘sepal_width',
                  xaxis2_title='sepal_length',
                  xaxis3_title='petal_width',
                  xaxis4_title='petal_length')
fig.show()
図17 tipsデータセットを読み込んで散布図を描くコード
df = px.data.tips()
fig = px.scatter(df, x='total_bill', y='tip',
                 color='day', size='size',
                 hover_data=['time', 'sex', 'smoker'])
fig.update_layout(width=800, height=600)
fig.show()
図19 曜日ごとのチップの額を箱ひげ図で描くコード
fig = px.box(df, x='day', y='tip', color='day',
             category_orders={'day': ['Thur', 'Fri',
                                      'Sat', 'Sun']})
fig.update_layout(width=800, height=600)
fig.show()
図21 二つの箱ひげ図を並べて描くコード
fig = make_subplots(rows=1, cols=2)
figs = [px.box(df, x='day', y='tip', color='day',
               category_orders={'day': ['Thur', 'Fri',
                    'Sat', 'Sun']}),
        px.box(df, x='day', y='total_bill', color='day',
               category_orders={'day': ['Thur', 'Fri',
                                        'Sat', 'Sun']})]
i = 0
for f in figs:
  for g in f.data: fig.add_trace(g, row=1, col=(i % 2)+1)
  i += 1
fig.update_layout(width=800, height=600,
                  title_text='tipsとtotal_billの比較',
                  xaxis_title='tips',
                  xaxis2_title='total_bill')
図23 バイオリン図を描くコード
fig = px.violin(df, x='day', y='tip', color='day',
                category_orders={'day': ['Thur', 'Fri',
                                         'Sat', 'Sun']})
fig.update_layout(width=800, height=600)
fig.show()
図24 ヒートマップを描くコード
fig = px.density_heatmap(df, x='day', y='time', z='tip',
                         histfunc='avg',
                         category_orders={'day': ['Thur', 'Fri',
                                                  'Sat', 'Sun'],
                                          'time': ['Dinner', 'Lunch']})
fig.update_layout(width=800, height=400,
                  title_text='曜日と時間帯のヒートマップ(tip)')
fig.show()